Richard’s Project
The Gross Wing
It was one of those cold, wet and windy late spring days and I fancied something more constructive (!) than not being able to get in the garden. Catching up on an RCM&E, I was intrigued by an ad. for a laser-cut kit.
The Gross flying wing looked different; it was based on a 1948 free flight model. It boasted a 2.4m wingspan, over 500 laser-cut parts and the ad. claimed that it could be assembled in just a few days- but I doubted that would be the case for me. It used 3S 2300 mAh LiPos, which I had, and there were optional electronics and accessories packs which would be convenient and save time online. The only extras would be the Rx and covering. Even better, it was designed and made in the UK, near Lincoln, by a company called Modern Vintage Models. It was a new project for them and any enquiries by phone or email were always answered quickly, personally and most helpfully. The introductory discount was irresistible.
The Kit
The kit was well packed and seemed of excellent quality, with all sheets and parts clearly identifiable. There was no plan sheet (that would have been a very large piece of paper) but the Build Log ran to nearly 80 sides of A4 and was clear, concise and illustrated with plenty of photos. This was the first production run, and I may have been only the third customer: there were a couple of glitches, but modified parts were quickly provided. It seemed to have been well thought through: even the thick plastic bag in which the kit was shipped would double as a protective sheet when the wing was being glued up.
The Build
The build principle was generally to dry assemble a section before applying glue, often using tape to keep things secure, which I liked. Most was held by Aliphatic or SuperPhatic, with Epoxy used in a few places such as securing the magnets.
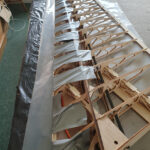
The wings used ply spars, and a 1m carbon rod was advanced through each rib as it was added to keep everything true. As later with the fuselage, this made the growing wing stable so that it could be handled and moved around as necessary. At no point was it necessary to pin parts to a board, which was handy as the assembly often overlapped my table. The parts fitted together perfectly which made the build a joy.
The trickiest part of the wing build was the optional 1/32 balsa sheeting of the LE and tips- this could have been left to the shrink covering. However, the technique was clearly explained and patience, prior dampening and plenty of tape produced an acceptable result.
The spine of the fuselage would be the tail boom, a long ply box, to which the rear fuselage formers would be added, while the ply wheel box supported the front formers; substantial ply fuselage wing ribs linked all the formers behind the hatch. A temporary carbon tube on each side, through the formers, kept everything straight and true and allowed the structure to be manhandled: so much easier than a fuselage jig. These tubes were only removed near the end, prior to fitting the nose cone.
The canopy, removable to give access to the battery bay, was designed to be retained by six pairs of magnets but I found the grip a bit fierce and subsequently removed a couple. So, if the canopy goes flying off on its own, it will be my blame.
Ironically, after my opening sentence, we had an excellent summer so I was able to get into the garden, and elsewhere, and the build became a leisurely process which spanned months.
Covering
Oracover was the suggested covering and I went with that. I had little experience of heat shrink and was grateful to Tom for his advice as I found the prospect a little daunting. It proved to be rather a steep learning curve but the film seemed quite forgiving as you got used to it, and the accompanying instructions were comprehensive. As usual, folk on YouTube had plenty of advice to offer. My main concern was the fuselage with its complex, concave curves below the wing. Two tips from MVM were to use matched spray paint on areas of concern first, so that any gaps would not show, and to use strips of film, rather than trying to be too ambitious and cover a large area in one go. Both helped a lot. It was rather like wallpapering: I know where all the joins and patches are but hope that casual observers will be less critical.
In retrospect, a transparent covering for the wing might have shown off the structure.
Flying
I don’t know yet! Apparently, with her free flight heritage she flies in a gentle and benign fashion and I look forward to those calm days when my thumbs are more practiced and confident than now. Hand launching may be over the soft, long grass.